

A carry-in just waiting to be recorded by someone.
Okay so in our last post, we discussed why tracking the Neutral Zone is important. We also briefly discussed what we track when tracking the neutral zone. But in this post, I’m going to provide you with a detailed guide and the resources you will need to actually track the neutral zone yourself.
What You Need For Neutral Zone Tracking:
Neutral Zone tracking doesn’t require much. At a minimum you only require:
1. Access to NHL Games
2. Something to record Neutral Zone Entry #s (Usually a spreadsheet)
3. A place to compile your total #s (Usually another spreadsheet)
1. Access to NHL Games:
Access to NHL Games is the obvious ingredient you’ll have to get on your own. Prior to this year, I’d have recommended the NHL Vault, which offered the cheapest legal ability to gain access to old NHL games (and what I used). Unfortunately, The NHL has ended the Vault as a stand-alone service.
Otherwise you can use NHL Gamecentre or maybe even tape games on your TV. Gamecentre has its own issues, but it does come with a button to rewind games 10 seconds and to put the game in slo-mo, which can be pretty useful for tracking (particularly the ability to go back 10 seconds). If you want to use non-legal methods, you’re on your own.
2. Something to record Neutral Zone Entry #s:
In theory you can formulate your own methods of how you want to record zone entries – whether your own custom spreadsheet or even by pen and paper (I’ve done that last one before). But for this guide, we’ll be using a common spreadsheet to track games, which you can find and download below:
https://www.dropbox.com/s/ilaubsgtr9na1ye/Zone%20entry%20template%20v16.xlsm?dl=0
This sheet was developed first by Eric Tulsky and is really really useful for tracking, so I highly recommend using it. I’ll be referring to this as the “Game Sheet” throughout this guide.
3. A place to compile your total #s
Again, you can use your own spreadsheet for this if you’d want, but we’ll be using the following Eric Tulsky creation you can download here:
https://www.dropbox.com/s/m9lh58kmdds9p75/Total%20Entries%20Spreadsheet%20Template.xlsx?dl=0
The above sheet is made to work specifically with the format of the individual entry sheet, so I strongly recommend using it, and we’ll be using it in this guide, where I’ll be referring to it as the “Total Sheet”.
Two final notes:
1. All of the below spreadsheet instructions are for the Windows version of Microsoft Excel – If you’re using something else, you’ll have to improvise.
2. The below instructions are for tracking one team at a time in a game, so that you get the #s for players on one team. If you want to track both teams in a given game, you’ll need to adapt the sheet – this is pretty easily doable, but email or contact me on twitter for help with this.
Getting Started:
Once you have a game you want to track, open your Game Sheet. You’ll obviously want to save the Game Sheet in a particular way to identify the game you’re tracking (for example: “2016 Isles Game 1” or NHL Game “20741”, etc.). Your sheet will look like the below:
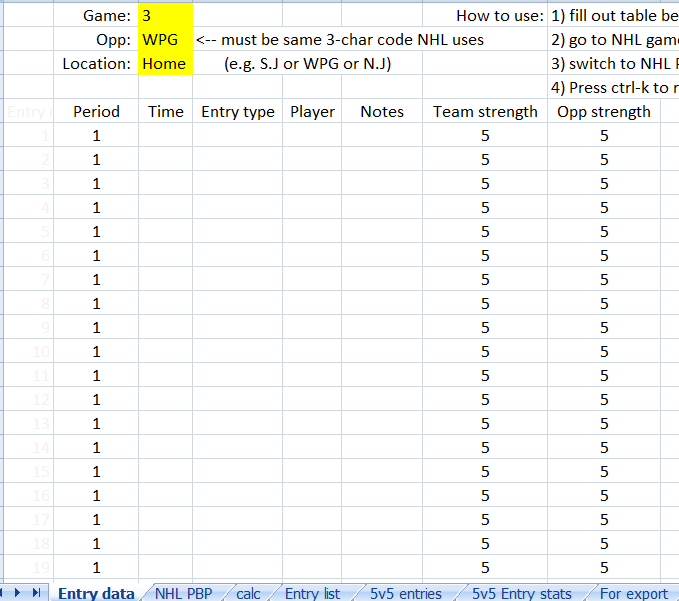
The words on the top right explain how to use the sheet, but just to explain further, here’s what you need to do first before you can start tracking.
First, change the game # to the appropriate game # (you can either use the official NHL game #, which I’ll reference later, or just the game # it is for your team in the season). Then of course change the opponent and home/away designation as appropriate.
Second, switch sheets in the spreadsheet to the sheet labeled “5v5 Entry stats.” You should see a sheet looking like the following:
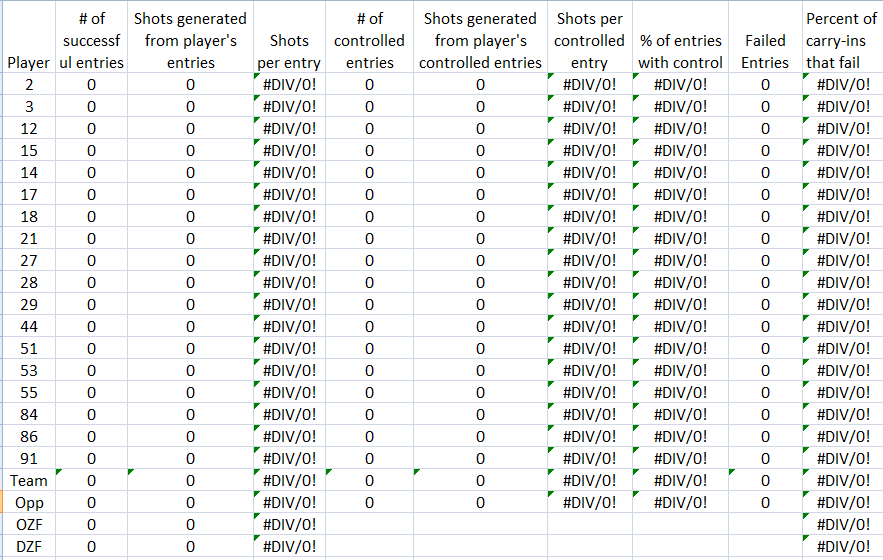
Here, all you need to do is change the Player #s to match the players who will be playing on your team in this game in question*. This is where you’ll get the results of your individual game results.
*You don’t need to actually use just player # – you can use whatever you want to differentiate between players, but you’ll need to use whatever you use here in your actual tracking for this page to work, so I find simple # to be easiest. I know some people use the team’s initial and the #, so John Tavares is NYI91 instead of “91.” Again, your preference.
Third, switch to the sheet labeled “NHL PBP.” When you first look at it, it’ll be completely empty. That’s normal. What you need to do here is import the NHL Play by Play data into this sheet in Excel. You can find the NHL play by play data easiest by finding the game you’re looking for on nicetimeonice.com (Labeled as Play-By-Play obviously). The Play by Play data looks like this:

You’ll want to import this page into Excel into the NHL PBP sheet. How you do this depends on your excel version (Mine is Data->Insert from Web), but you basically put in this URL into the import text box that pops up, and import it into square A1. Note that Excel will seem to hang for a minute or two after you put in the URL – there’s a lot of data here to import so it takes the program a while. That is normal. Your final result should look like this:

After this, you’re done setting up your sheet for tracking, so switch back to the Entry Data sheet so we can begin tracking.
IMPORTANT: After all of this, do not manually change anything in the sheets other than the Entry Data sheet. You’re all setup now, and every other sheet is involved with the calculations we’ll deal with later, so if you mess with it, the calculations may not work.
Tracking an NHL Game: Recording the Data
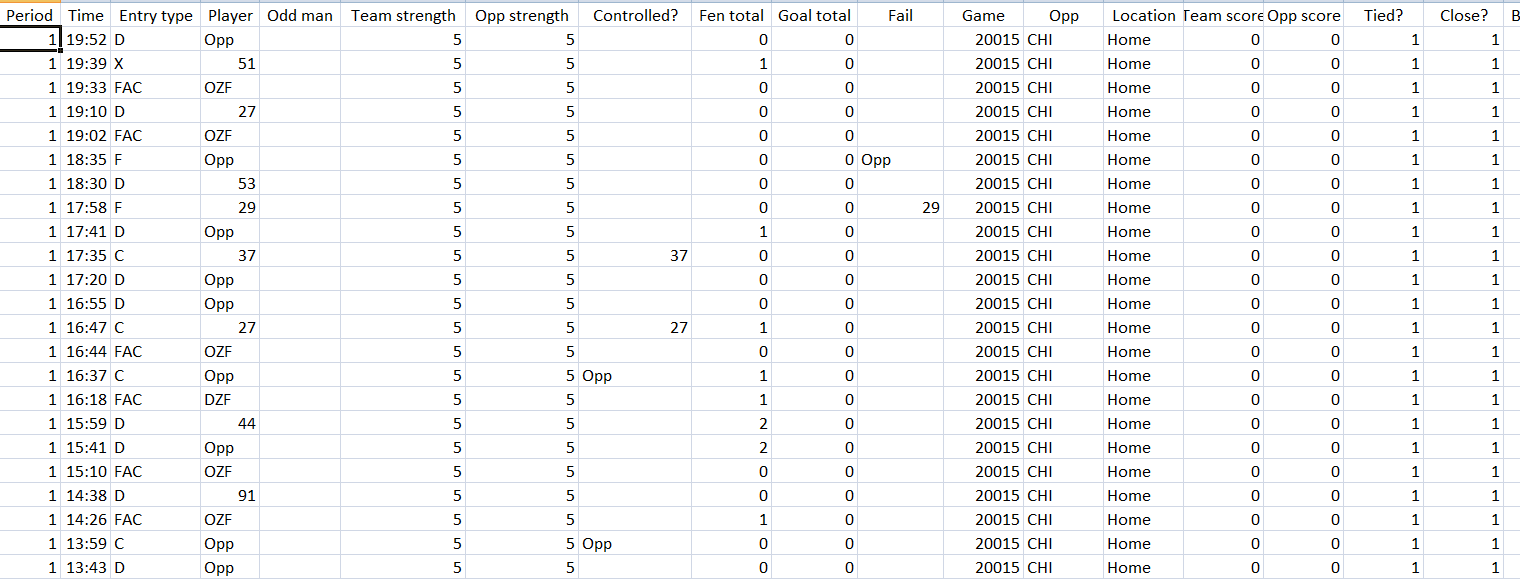
Okay, so we’ve finished our setup, let’s get to actual tracking! Now, as you watch a game, for each zone entry that occurs, you mark down on the Entry Data sheet the time (listed on the clock), the Entry Type, the Player who performs the entry, and the strength of the team you’re tracking and the opponent. Let’s break down each of those things in turn:
What is an Entry? Every tracker has slightly different definitions of all of the terms we’re going to use here. It’s why different trackers doing the same game may have slightly different results. I’m going to explain here my definitions as best I can, but as you learn to track, you’ll develop your own habits as to what you consider an entry and what you don’t, and what you consider a controlled entry and what you don’t. This does make comparing data between different trackers tricky, as “tracker bias” – differences in data due to differences in how people track as opposed to differences in actual things that happen – need to be accounted for. But for your own individual work, this shouldn’t be an issue.
Anyhow, the key thing is determining what is a zone entry. A zone entry is where a team manages to get the puck from the neutral zone into their opponent’s zone with the intention and possibility of getting a shot off on net. So a dump and change doesn’t count as an entry because well, the dump-in wasn’t made with the intention of taking a shot.
A trickier thing is that “possibility” thing I mentioned in my definition. For me, even if you get the puck physically into the offensive zone from the neutral zone, it’s not an entry if there was from the start no chance of a shot getting off – because you didn’t really get the puck into the offensive zone successfully. So a dump-in attempt that doesn’t even get more than a few feet from the blue line before being picked up by a Defenseman who promptly sends the puck back out is not a zone entry I would track. Similarly, a carry-in attempt immediately broken up a foot inside the line with the puck going straight to an opponent’s stick is not an entry. For controlled entries, my rule is basically whether or not the player had the ability to take a shot while in the offensive zone before losing the puck – if he did, it is an entry. If he didn’t, it isn’t. Again, this requires some subjective judgment and as a result some people may track more entries than others. I tend to be relatively stingy (although others are stingier), requiring that the puck get a little bit farther than the blue line on a carry-in for me to label it as an entry. One important reminder: we don’t care about the intent of a player trying to make an entry, only if they actually succeed.
Should we ever mark down non-entries?: This question is the important exception here – the way this sheet works allows it to tabulate how many fenwicks occur per each zone entry made by each player. Sometimes, shots will occur off of non-faceoff and non-entry situations – for example, a team turning the puck over in their own zone, or a shot from the neutral zone. In these situations, you want to write these down as if they were actual entries with a time slightly before the shot was taken, but using the designation “X” for the entry type. This is to ensure that when the script calculates shots per entry and the other spreadsheet we’ll later use tries to calculate the score of the game, it will be correct.
Basically, you’re using the “X” entry type for non-entry non-faceoff events that can lead to a shot.
You may also want to mark down whenever a player “fails” at making an entry, using the letter “F” as an entry type. This is up to you if you want to do it (I don’t), but you can use this to mark down how often players fail at entries overall, or just to mark down how often they fail at carrying-in. This is your prerogative, the sheet’s formulas work either way.
Otherwise, don’t mark down non-entries.
Period: What period does the entry occur? Self explanatory here.
Time of an Entry: This is again pretty self explanatory – you mark down the time on the clock remaining when an entry occurs in the appropriate column. If a shot is taken near simultaneously with the entry (or if it’s a “X” event discussed above), you might want to mark the time down as being a second earlier than the actual entry, just to make sure the sheet is attributing the shot to the right entry.
Entry Type: I’ve mentioned Entry Types before, but basically, for each entry, you mark down the following:
“C” for Controlled Entries – Carry-ins or Pass-ins
“D” for Uncontrolled Entries – Dump-ins, Tip-ins, or other such entries
“F” for Failed Entries – as noted above
“X” for every other non-entry needed to ensure the calculations work (see above and further discussion below)
Let’s go over these in turn:
“C” for Controlled Entries – These are entries where the player making the entry (or the recipient of the pass-in) have control throughout the entry. For myself, that means that these entries are ones where the player has the ability to take a shot or pass immediately after entering the offensive zone – because he has control of the puck. If a player attempts a carry-in but is met at the blue line and the puck is immediately lost and goes into the corner, that’s not a Controlled Entry. Similarly, if a player tries a pass-in but his pass misses the player he’s trying to hit, or the pass can only be tipped-in by the recipient of the pass, that’s not a controlled Entry. Again, Intention of the Player doesn’t matter.
“D” for Uncontrolled Entries – “D” initially stood for dump-ins, but we use it to code all uncontrolled entries. So you use this for dump-ins, tip-ins, and even carry-in attempts that are broken up immediately but that still are entries – it’s fairly common for a carry-in attempt to result in the puck falling into the corner as if the entry was a dump-in – these are coded as “D”.
“F” for Failed Entries – again, these are optional, but if you want to code failed entry attempts, use the letter “F.” How you do this is up to you, but remember that a carry-in that is “broken up” but still results in the puck in the offensive zone is NOT a failed entry, but is instead an uncontrolled entry. Failed entries are where the entry attempt is stopped at the line such that the puck never meaningfully crosses the blue line – so a carry-in where the puck is immediately knocked back out or where the puck is immediately knocked to a defender, who can then take it back out.
“X” for Everything else that could result in a shot. We’ve discussed this above and we’ll discuss it a short time later below.
Player – For each entry, mark down the player who made the entry. If it’s a player on the team you’re tracking, use the player’s # – or if you used something other than Player # when setting up the sheet, use the same thing you used there. If it’s an opposing player, mark the entry as “Opp” (Capital O, lower case p, lowe case p). For a pass-in, I mark the passer, as he creates the entry. But that’s up to you.
Team Strength and Opp Strength: Here you mark down the strength of each side at the time of an entry. So if it’s 5-on-5 play, you mark down 5 for each one.
Note: The sheets only track 5v5 play. So you don’t need to track special teams. I don’t myself as it saves time. But if you don’t track special teams, you need to make sure to do the following to ensure the calculations work:
1. If a goal occurs on special teams, record an “X” entry for the team who scored (just pick a random player on ice if its your team, otherwise you can use “Opp”) a second before the goal with the strength of the teams at time of the entry. This is to ensure the calculations of score are correct.
2. Record an “X” entry for the last second of special teams time before play returns to 5v5, again noting the correct strength of each team. Again, this is to make sure that shots that are the result of a special teams entry but occur on 5v5 (think of all the chances teams get just as the power play expires) are attributed to the special teams and to the right team.
—–
In addition, there is a column called “Notes”, where you can put whatever you want. I know some people have recorded the player who defended (or attempted to) each entry in this column. If you do again, note that the sheet as set up doesn’t record this, although with some modification, it possibly could (contact me by email if you want to try this).
Tracking the NHL: Compiling the Data
When you’re finished with a game, now you need to compile the data. First, make sure macros are enabled in excel (Excel will usually tell you if Macros aren’t enabled. Even if it doesn’t, if they aren’t enabled, the below commands won’t work, so it’s pretty easy to tell). Once they are enabled, press CTRL + K. This will compile the individual game #s on the 5v5 entry stats sheet – here’s where you can see how your team did in that game in the neutral zone.
After this, press CTRL + J. This will fill in the sheet labeled “For Export.” Now open up our second spreadsheet I included above, the Total Sheet, and make sure you have the Entry List sheet open. Now, copy and paste the data from the “For Export” tab into the Total Sheet (excluding the first row of the “For Export” tab, which just contains the legend). You should get a sheet that looks like this:
Make sure your copy/paste doesn’t accidentally paste over the values to the right of the Location column – those are formula columns used to compile the results.
Now go to the “5v5 stats” tab in the Total Sheet and again, enter your team’s roster by #s, or however else you want to identify your team’s players. Now this sheet will calculate your team’s overall season long neutral zone numbers. You can even see your team’s overall Neutral Zone Score, Offensive Zone Score, and Defensive Zone Scores, to see how well the team is doing in each of those zones.
Conclusion:
If you’ve done the above, you’re pretty much set. The one thing the above won’t get you is individual ON ICE neutral zone data. As I mentioned in the prior post, this is pretty important at showing you who is winning the neutral zone.
To get this data, I run the total sheet through a script created by Muneeb Alam, which you can find HERE. I have a sheet that then compiles this data into usable form, so if you want to use this, please contact me and I’ll give it to you.
Otherwise, you now know all you need in order to track a hockey game. Hope you have fun and learn interesting things! Feel free to contact me if you want any help.

I’m not sure I like your definition of zone entries.
“A zone entry is where a team manages to get the puck from the neutral zone into their opponent’s zone with the intention and possibility of getting a shot off on net. So a dump and change doesn’t count as an entry because well, the dump-in wasn’t made with the intention of taking a shot.”
Now, I realise that this is obviously a matter of preference to some degree, but I still think a more open definition has advantages over this one.
Your definition seems to be intended to make the zone entries themselves the positive result, which means you can use Entries/60 or Entry For% as measures of quality. But I think that tracking more entries (especially including dump and changes) includes more information and still gives you measures for quality. If you include more entries, things like Control% and SA/Entry gain more meaning and the raw number of entries becomes less important.
I think excluding things like dump and changes would make sense if you could somehow prove that all players rely on them equally often, but (at least in my subjective opinion) that isn’t the truth at all. So when trying to assess why a player’s shot differentials are bad, you’re giving yourself less information to work with. You can say “He doesn’t get any decent entries” because his entries/60 is very low. But you don’t know how much of this is because of general problems getting out of the DZ (the direction of play getting switched before the opp. blue line) or if it really relates to problems with bad/uncreative entries. Whereas tracking more entries/entry attempts gives you a closer look at where the problems really are.
Of course this isn’t a black and white thing and the number of events between the tracking systems might not differentiate that much, but if this isn’t the spot to discuss these details, I don’t know what is 😀
There is some subjectivity here, as I mentioned above – go track as you want! My counter to your arguments however would be as follows:
The issue with including D&Cs is that they’re not made with the intent of generating offense, even if they might otherwise be considered “successful entries”. (I’ve kind of started tracking them this season to look at score effect issues, but using a separate code). Our work which tried to evaluate the value of a controlled entry vs an uncontrolled entry thus is skewed if one type of uncontrolled entry is by definition going to have a value of 0.
Mind you, pure dump and changes, which are the ones which I myself exclude are rarer than you’d think – usually you get the dump with 2-3 guys going after the puck and 2-3 guys changing simultaneously, which do get recorded since the dumping team is trying to actually get a shot off while the change is happening.
Again, you can choose your own definition if you want! The sheets will work for you either way.